A while back I was looking for a solution that would give me a better picture when it came to deployments and releases then what I was getting from Jenkins. Jenkins may be the most popular CI build orchestrator in the world but lacks in the area of deployments. There are different needs when it comes to deployments and releases that are quite different then what you want from a CI tool. In the context of a CI build it’s target is an artifact and in my case these are currently Docker Images but they could be release packages. In the context of a CD tool I will have several targets that are instances of the artifact that was built. Now in the interest of testing and promoting the good builds, I could have several builds that are in different stages of development and others are ready to move on. From a CD context I need to know exactly what versions are in each of my environments of Dev, Test, Stage, Production.
My needs are quite simple as this is my own personal project and do all the development and some of the testing. The only people that have access to the source and the pipelines are the same ones that take responsibility for the deployments to be turned into releases and approved for Production. This eliminates the need for an approval process in my world but I do have builds in various states that are in development or currently being tested so the need still exists where I need to know what I have in each of my environments. I do have a main rule in my Jenkins pipeline to only deploy builds that have come from the master branch. This saves me from the embarrassment of pushing something into production that is still half baked. This is intended as a safety gate cause sometimes you are tired and if my CI pipeline has stopped at a stage waiting for me to push the proceed button I might not notice that this might just be an alpha or beta build. I wrote a blog some time ago called Master Only in Production, an Improvement which was based around Azure DevOps but the concept is the same in Jenkins.
Badges
I realize that all I really need were some build and deployment badges that would tell me what was successfully deployed at each environment. If I had that and it was updated automatically this would solve my problem and I could stop looking for a simple CD solution. I could get everything I needed from the Jenkins pipeline and not feel like I have some process that really just feels like over kill.
In today’s post I will show you how I constructed the badges and then how I consume them on the README.md page. There is a plugin that you can use in Jenkins but I did not find it all that useful as the result was a url back onto my Jenkins Server which is on a box that GitHub cannot call directly. What I needed was an actual file that I can put onto a share that my github pages could access them from. My stage/test/dev environment is closed to all IP address except for mine. This is part of a security thing, I don’t want anyone being able to reach the half backed updates as they go through their testing cycles. My production environment is different as it is exposed to the world through a secure SSL connection. This connection is open to all IP addresses so I wanted a simple docker container that could live in my production environment. From here my github ReadMe files could easily get the images from this server and would have access to these files 24/7. My first trick is to produce the badge and get it over to the underlying shared volume of the docker container.
Step 1. Create A Physical Badge
First identify where you want to make a mark in your pipeline. Think of this as a milestone. There may be many milestones in the pipeline that you may want to track. Over time you may want to revise this as you may change your process for better efficiencies and clarity. DevOps like any other process is itself part of a continuous improvement cycle. We should always be on the look out for ways that can improve things. In my initial stab at this I keep things pretty simple but I do want to track the following flow:
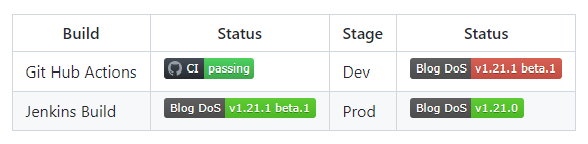
Build --> Dev --> Prod
So at this time I just want to show three (3) badges one for each of these steps that I indicated. So after my build step but still within it I want to add a post with a success and failure sections. So at the end of the steps (just to recap the hierarchy of the pipeline is stages –> stage –> steps –>) and the post would be in parallel to the steps but still inside of the stage. Then for the success step you would run the following curl command:
sh "curl -o blogBuild.svg https://img.shields.io/badge/Blog_DoS-v${params.semver}-success.svg"
This URL that I am using is a simplified version from some of the others that I found. However, in that simplicity there is a very specific syntax that you must follow. There are three parts to the instructions I am sending in:
- The left side of the text (in my case this is Blog_DoS)
- The right side of the text (here I set my version number which I have stored in the parameter params.semver)
- Finally this is the color of the badge. (success is green, critical is red, you can add other colors for other ideas.)
These three elements are separated by a "-" so you want to make sure you are not using the dash in your names or version numbers.
Step 2. Copy the Badge to a public shared location
Even though my badge is being built as part of the Jenkins build process I needed to move this badge to a location where my github pages could access it. In my environment I have a Jenkins Build Machine that is in a Docker container running on a machine that can only be accessed from my IP address. This means that Jenkins can pull the repository from GitHub but GitHub cannot see anything on my Jenkins Build Machine. The solution I chose was to have a Docker container that is running in my Production environment that is accessible from the world but only on port 443.
The container itself is just a simple nginx image not even a docker image that I build. I deploy it onto my production machine using a docker-compose file. The docker-compose file is a simple YAML file that describes the container and what it is going to do. The proxy server which is another nginx container is going to be listening on port 443 and it is going to send the traffic to this container when the dns entry matches. The nginx image is just a simple container that is going to be listening on port 80 and serving the files from the shared volume. The shared volume is a directory that is shared between the container and the Production host machine.
    badge-server:
        image: nginx
        container_name: badge-server
        volumes:
            - /docker/badge:/usr/share/nginx/html
        restart: always
        environment:
            - "VIRTUAL_HOST=dns_cname_to_your_server"
            - "VIRTUAL_PORT=80"
            - "LETSENCRYPT_HOST=dns_cname_to_your_server"
        networks:
            - app-net
From the Jenkins pipeline we ssh into the Production host machine and copy the images that we just created into the shared volume that is share between the machines and the container. The container will see this file and when asked for by the GitHub Readme pages it displays the image that we called up. The following code snippet is from the Jenkins pipeline using the ssh plugin. I have setup my credentials in a Jenkins credentials plugin that keeps them secret and out of my source. What follows after that are five shell commands that I am running on the Production host machine.
    sshagent(['83635231-8fbd-41cd-8899-efd9d11937ed']) {
        sh "ssh -o StrictHostKeyChecking=no <user name>@p<your server name> ls /docker/badge -l"
        sh "scp ./blogBuild.svg <user name>@<your server name>:/docker/badge/images/blogProd.svg"
        sh "ssh -o StrictHostKeyChecking=no <user name>@p<your server name> chmod 0777 /docker/badge/images/blogProd.svg"
        sh "curl -X PURGE https://camo.githubusercontent.com/????????????_camo_value_????????????????????????"
        sh "ssh -o StrictHostKeyChecking=no <user name>@p<Your server name> ls /docker/badge -l"
    }
Step 3. Add the badge to the README.md
On your github repository you will want to add a badge to the README.md file. This is a simple markdown file that is in the root of your repository. The following is an example of how to add the badge to the README.md file.
[](https://<url to your jenkins server>>/job/aAffirm_Store/)
This markdown has two parts to it. The first part is pointing to where your badge image is located and the second part is a url that you might want to point to your build job on your Jenkins server or what ever makes sense to you when you click on the badge. In my case, my repositories are private and besides you can only get to my Jenkins server from my network IP address.
The story could almost end there except that GitHub has gone out of its way to make things secure for you as much as possible. It uses a camo server to create these random keys to hide the actual location of the file it is serving up. The problem here is that this is also cached so you can update your image and your cached one is the one that keeps getting displayed. It is not your browser cache, it is GitHubs cache. Let’s solve that in the next step.
Step 4. purge the GitHub cache
The next step is to purge the GitHub cache. This is a very important step because it will make sure that the next time you update your badge you will get the new image. The purge command is very simple. It is just a curl command that is going to send a request to the GitHub API to purge the cache. The trick here is to first off find what that camo value is. The camo value is the last part of the URL that you see in the GitHub Readme. So if you are looking at the badge that I created in the previous step you can see that it is going to be frozen in time and no matter how many times you clear your cache and try using a different browser that has never been to your github site before if there has been a newer build and new badges were generated you will always, always see the old one and never see any updates. The problem is not you it is GitHub trying to protect you from the outside world and of course keeping it from getting an image that it feels has not been updated.
There is a way around this and if you look at the code that I displayed earlier when we copy the image to our shared location I added one more curl command that conducts a PURGE request to camo.githubusercontent.com with a key. Each image has a unique key that is generated by GitHub. To find this value you will need to open your README.md file from the browser and then do a right click and choose view source. Then search for on this page the name of something around your image like the url that you added after the badge to dictate where the user should go when they click on the badge. Don’t look for your badge name as you will not find it, as GitHub has hidden all that with this camo url. The image source has the url that you need to purge the cache. Just replace the url in the fifth line of that code block above and every time you change you badge the image cache will be purged so your new image will show up on the GitHub page.
Tell Me Again, Why Do You Need to Do This?
If you are able to use the badge plugin in Jenkins you would not need to do this. That plugin provides you with a url that you and use for your markdown badge and gets updated with each build but GitHub needs to be able to see your Jenkins Server. Mine cannot, so I had to build a physical image that I store somewhere that GitHub can reach. The url image from the Jenkins Badge Plugin does the job and the Readme page is up to date, but because I am using a physical image I run into this cache issue. If you are doing something similar to me then these tips and steps I have outlined here are going to be very helpful. If GitHub can see your Jenkins Server then you will not need to do this.