In a proper CI/CD setup where we are building once and deploying that build to various environments as it travels down the pipeline towards production there is almost always a set of configuration files that are different for each environment. Over the years there have been a number of different techniques that have been used to manage this like never deploying the web.config file during a website deployment or storing the various configurations and copy them to their locations at the time of deployment. The problem with either of these techniques is that if there is a change in the configuration you need to track down all these config files and update them and because of the mindless copy and paste that would occur with that exercise, it really opens you up for the possibility of errors and because one of these environments could be production, the risk factor is very high.
Configuration Transformation
Along the way better solutions did appear like the web.config that had a version for each environment. What actually went in the files where just the things that were different for each environment done using Transform commands. The biggest problem with this was that you needed something like a build to drive it and so in order to get a build with the proper QA web.config file I would have to create a separate QA build which kills the whole build once and deploying to many environments policy that you want to keep in place.
There was also a transformation that could take place if you used MSDeploy or WebDeploy to deploy your website. This is the recommended way to build and deploy a website to IIS. You simply pass in the arguments “/p:DeployOnBuild=true /p:WebPublishMethod=Package /p:PackageAsSingleFile=true /p:SkipInvalidConfigurations=true” and the outcome would be a zip file of the content, a batch file and a SetParameter file. The problem with the SetParameter file is that although it was pretty good at getting your default connection setup, if you had other connections and things that you wanted it was a very complicated process in order for you to implement this in a complicated web site.
Token Replacement
Another approach was to tokenize your configuration files with values that you want replaced. I have used this technique for many years on my own projects. Since the purchase of Release Manager there was introduced to the Azure DevOps community the idea that a replaceable variable would begin by double underscore and end with a double underscore. For example:
__MyVariable__
Then a tokenize replacement tool would replace these tokens with real values from your variables table in the build or release pipelines. There is an extension task called “Replace Tokens” and it looks for tokens like this matches them with the variable in the variables table in this case that would be MyVariable and replace it with the value for that scope (the scope is the environment that you are deploying to like Dev, QA, Staging, Prod).
Like I said, this works quite well and I was happy with this except that the tokens were stored in my source control and I don’t have a build process updating my configurations as I am running these programs locally while writing code or debugging an application. I used to have little logic methods that looked to see if what was returned was a token then pass in my local connection string. Now I am doing something different in my work area then what is happening to the application in other environments.
A Better Approach and So Easy
The rest of this post is going to explore an even better way and it is so easy, no complicated transform rules to learn or create. I will setup a sample web application and walk you through the process. There are a number of assumptions that I a going to make so you can determine if you fall into the same sort of scenario then this solution should work for you as well right out of the gate. If your situation is a little bit different you might need to make a few adjustments.
- I am using Azure DevOps Service
- The web application is an ASP.Net MVC full framework (uses web.config)
- The web application could be a ASP.NET Core (uses appsettings.json)
- The target can be an IIS running in a virtual machine
- The target can be an Azure App Service.
This is what we are going to cover here. Deploying to the targets is exactly the same, there is a little different approach that you take between the full framework and the dotnet Core applications and I will cover them both.
The web.config files
For the older web sites that are built using the full .net framework, the configuration is managed by the web.config file. In my sample application I have a web.config file that has two different connection strings and they are different for each of my environments that I am deploying to.
A Word About the build
Make sure that when you create the build that you are creating an MSDeploy package, which really is just a zip file will all the pieces needed for MSDeploy to deploy your web site to your target. If you are creating a new build definition, which the choice of templates comes up choose the ASP.NET (if you are using the older full framework web application) or the ASP.NET Core (if you are building the new dotnet core web application). This will give you all the necessary tasks to get you up and going quickly. When you do that it already populates the MSBuild arguments with all the appropriate arguments to create the package for you.
If you already have a build definition setup and it is not creating the MSDeploy package, then add the following arguments to the MSBuild task.
- /p:DeployOnBuild=true
- /p:WebPublishMethod=Package
- /p:PackageAsSingleFile=true
- /p:SkipInvalidConfigurations=true
- /p:PackageLocation="$(build.artifactStagingDirectory)
Just list this one after the other separated by a space and you are going to land up with a zipped up package in your artifactStagingDirectory. In the new definition that was created from the template it also included a Publish Artifact task which then takes the output from artifactStagingDirectory and pushes it into the final build artifact. We will need that for our deployment steps which is where the point of this post takes place. If you do not have a Artifact Publish task then you will need to add one at the end of your build definition.
If you search for Publish build artifacts you should see the task. You can pretty much leave the defaults as they are just make sure that the Path to publish is : $(build.artifactstagingdirectory)
The Release definition
I am assuming that you probably already have a release definition setup to deploy this web application to a couple of environments that may or may not include Production. Likely because you had issues with dealing with the different configurations especially between your testing environments like Dev and QA and the Production environment which is usually wildly different from the other two. I would also assume that is why you are reading this post so that you can implement these changes and have the peace of mind that each environment will get the correct connection strings as they travel through the pipeline.
In this next section this is where things differ between the older ASP.Net full framework and dotnet Core. I will cover each of these in their own section and you just need to follow the instructions to the type of web app you are deploying.
ASP.NET (older full framework)
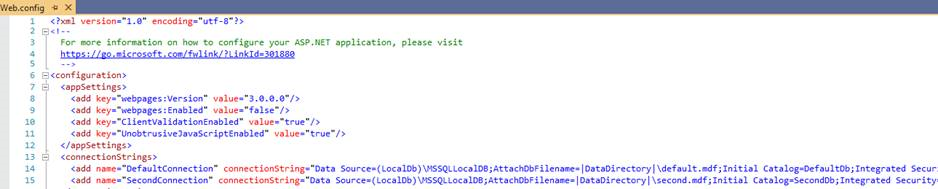
For the legacy AGP.Net full framework the connection string is stored in the web.config file. So lets look at that.
{% asset_img web.config.png “web.config with two connection strings” %}
In this sample you see that I have two valid connection strings in the connectionStrings section of this web.config file. One is called “DefaultConnection” and the other is called “SecondConnection” It is important to note the name of these two connection strings because we will need them in the next part as add them to the variables table in the release definition.
Variable Table
In case you may not be aware of what I am talking about, in an Azure DevOps Release Definition there is a menu item at the top that says Variables. When you click on it a page opens up similar to the following.

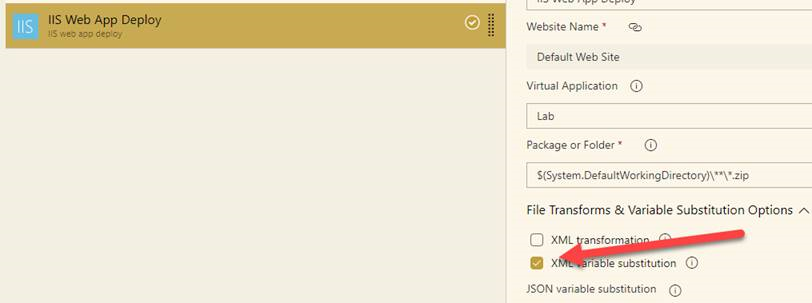
IIS Web App Deployment Task
Now, before you run off and try this out there is one more thing we need to do to this definition before it is ready to go. The magic which makes all this happen is the task “IIS Web App Deploy” When you are searching for the tasks I just enter IIS and that should be enough to see this task bubble to the top of the list.
This just makes things so much simpler and easy to manage no more of these situations where we are managing connection strings in a bunch of places or having to write complicated transform rules, you don’t even need to tokenize the web.config file it all just happens almost like magic.
ASP.NET (newer Core)
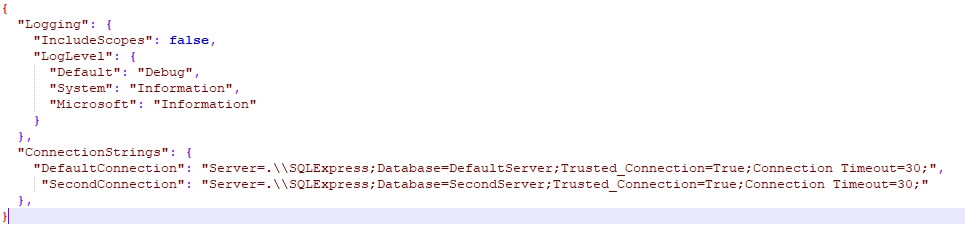
For the newer ASP.NET Core, things are a little different because the web.config if there even is one is much cleaner as ASP.NET Core is trying to follow a convention over configuration even more so then it has in the past. You are going to find that the connection strings are stored in a json file called appsettings.json. So the principle is similar the actual syntax is a bit different. So lets start by looking at a possible appsettings.json file and go from there.
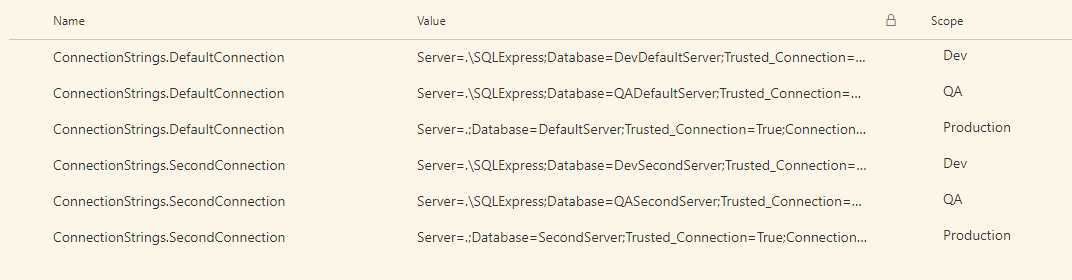
Variable Table
When we add these values to the variable table you will notice that I have included the parent node that holds these connection string as the prefix followed by a “.” then the actual connection string name. This is something that is different than dealing with the web.config file.
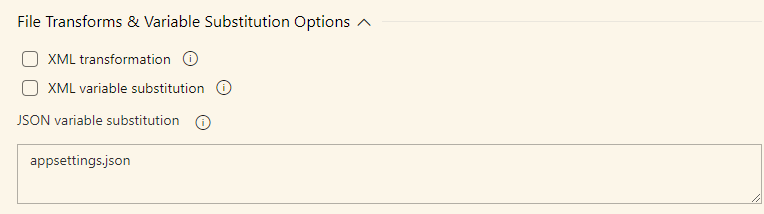
IIS Web App Deployment Task
One more slight twist that we need to address is in the IIS Web App Deployment task. This one is probably a bit more obvious as we are transforming a different type of file so there would be a change in the properties of this task for that.