I don’t have to wait
One of the first things that I did notice was that I didn’t have the feeling like I needed to wait until this big plan of mine to do a release. In the past I was using the Epic work item to plan out the finished features the I would need to complete to get the next release out. I even noticed before I had all these steps automated that plans would change quite often. The priorities and the well-meaning releases would take a turn to become something different like finding a critical bug that could affect the current customers. I would want to release that bug or feature as quickly as possible.
Before everything was automated, these things bothered me but there wasn’t an easy way to just get the release out there as there were still enough manual steps that you want to limit these. However, now there is no reason to get a build that has a complete bug fix or feature and push it down the pipeline and get it released into production. However, if this rush to production is now suddenly available to me isn’t there the possibility that something that wasn’t quite ready get into production by accident? That is why I came up with these 3 new rules that I set for myself that need to be followed before the build can be pushed into production.
My New 3 Rules for Releases
- Don’t allow any builds that came from any branch other than Master (git) or Main (tfvc) into production. If it is not Master then it should just be rejected in the deployment steps.
- A build that is released with success into Production, will be locked indefinitely with regards to the retention policy.
- The build number must incremented any time that we successfully released into production.
What follows are the ways that I automated these 3 rules and made them part of my operation. Now there is never a fear that something might get deployed into production that really should not. I can push things into production when it is important to do so and sometimes I might delay a release because there is no big benefit and saves the customers from having to download and install a release that could be packaged up with a later release. The point being that a release can be made any time it needs to and no more of this long range planning which never happens the way you expected anyway.
No Builds into Production that did not come from Master
As you may have gathered from some of my earlier posts, my personal projects have pretty much all landed up in git repositories that are remotely hosted in Visual Studio Team Services which is Microsoft’s cloud implementation of TFS. With that I am following a very typical git like workflow. Every Product Backlog Item or Bug starts with a new feature or bug branch. This is really nice as it gives me a nice level of isolation and knowing that my work will not affect the working code. It also gives me the flexibility to fix an important bug or PBI that changed in priority and know that the code I tore apart will not affect the outcome.
This also gives me the opportunity to test this code, confirm that it is complete and give it one more look through as the only way code from a branch can get into master is through a pull request. The pull request has a number of options with it as well such as squashing all the commits into a single commit (so I get a very clean and clear way of answering the question, how did you add this feature.) and deleting the branch after the merge.
Master is always the branch that represents production or ready for production. I wanted the code only to come from master because this is where all the branches come back to. Having a rule like this makes sure that the merge will always happen and that nothing gets left out. I have seen some very complicated branching structures when working with clients and something that I have seen quite often is that branches did not always get merged back to where they should. There would be these complicated discussions about where the code that goes to production should really come from. Here I have eliminated all the complexity by having a rule that says you can’t push a build that did not come from master into Production.
Now, how do you enforce this automatically? Well I could not find a task that would help me with this but I did know how I could do this with a simple PowerShell script.
    $branch = "$Env:BUILD_SOURCEBRANCHNAME"

    if ($branch -ne "master") {
        Write-Host "Cannot deploy builds from the $branch branch into Production"
        Write-Error ("Can only deploy builds from the master branch into Production")
        exit 1
    }
    else {
        Write-Host "Carry on, this build qualifies for a deployment into Production"
    }
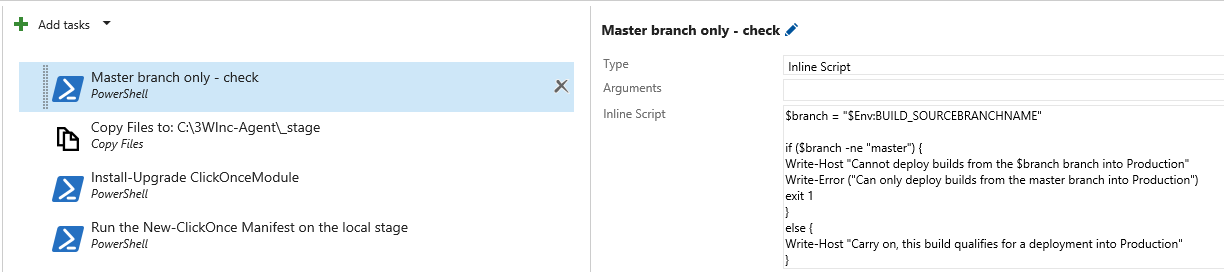
Using a PowerShell task at the top of a release for the Production environment as an inline script to implement this rule. If for some reason I pushed a build that came from some other branch this task will fail and not go any farther. In my world I typically have one build definition that is by default pointing to the master branch but I override that when I am working on one of my feature branches to get feedback on how the code is building and deploying. Which I really like because I am using the very same build and deployment scripts that I would use when going into production. So you can see how a build from one of these branches could accidentally get into production if I did not have this very elegant rule enforcement.
Locking A Released Build
During the process of development, there are several builds and deployments are happening all the time. However, most of these I don’t really care about as their only real value is to give feedback that the application was still able to build and deploy as it always has. So one thing I never want to do is to lock down a build that came from anything other than the master branch. I used to have a task on the build definition that would lock down any build that was created from the master branch. However this is not always a good rule to live by either as there have been times when the deployment of a master branch did fail while going through the release pipeline and other times it might not have failed but there was a conscious decision to hold off on a release but was merged into master to be added with a few more features.
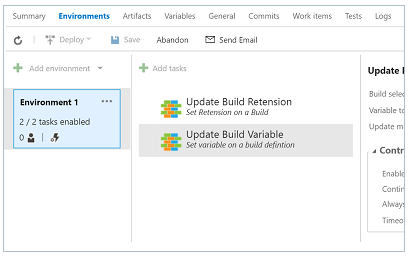
What I needed was a task that would update the build with an infinite lock on the build when ever it was successfully deployed into Production. For that task I did find one in the Microsoft Market Place that did exactly that. This task is part of a small collection of BuildTasks written by Richard Fennell who is a long time ALM MVP. In the Market Place it is called “Build Updating Tasks” and if you search for that, “Richard Fennel” or “Black Marble” I am sure you will find it.
I have this task near the end of my Prod deployment and set the Build selection mode to “On primary build artifact” and done. Works like a charm, when I deploy to production and it was successful it will find that build and set its retention to keep forever. I no longer have to think about making sure I don’t lose those builds that are in Production.
Increment the Build number
This rule has really allowed me to move freely into my new DevOps approach and no longer have this dependancy of the long planned release which I explained earlier did not ever get released the way I thought that it would. Things and priorities change, that is life. In my build definition I have a set of variables. One called the MajorMinorNumber and the other is the BuildNumber. These combined with the TFS revision number on the end gives me the version number of my release. So in the build definition under the general sub tab my Build number format looks similar to:
Product-v$(MajorMinorNumber).$(BuildNumber)$(rev:.r)
Now lets break this down a little. The MajorMinorNumber change rarely as they would represent big changes in the application. This follows something close to semantic versioning in that if there is going to be a breaking change I would update the Major Number, if there was going to be a big change but would remain backwards compatible then the minor number would be incremented. In the case where I am just adding some new features that are additive to the application or fixing some bugs then the build number would be incremented. The 4th number which is the revision is left for TFS to make guarantee that we always have a unqiue build number.
In the past I have been known for using a date like version number for applications that I didn’t think would really matter. However, I have even noticed with them that there is some very important information that gets lost. If I had a daily build going on and so the day part of the version number would increment everyday even though I might still be working on the same PBI or Bug. Instead I want to have a new build number after I have a successful deployment into Production. This means that I have customers out there who may have upgraded to a newer version and with that I can even produce some release notes as to what was part of that release. But I did not want to go and increment the build number in the build everytime this happened, I wanted this to be automatic as well.
The solution for this is using the another special task that is part of the last extension that we installled. There is a task called “Update Build Variable” and I have this as the very last task for the deployment into my Prod Environment. Very simple to setup, the Build selection mode is: “Only primary build artifact” the Variable to update: “BuildNumber” and the Update mode is “Autoincrement”.
Now after a successful deployment into Production and my build number is incremented and ready to go for either my next long planned set of feature or getting out that really quick important fix or special feature that I just needed to get out there.