Over the last year or so I have been experimenting and learning about git. The more I learned about this distributed version control the more I liked it and finally about 6 months ago I moved all my existing code into git repositories. They are still hosted on TFS which is the best ALM tool on the market by a very, very, very long mile. Did I mention how much I love TFS and where this product is going? Anyway, back to my git road map as this road is not as simple as it sounds because many of the concepts are so different and at first I even thought a bit weird. After getting my head around the concepts and the true power of this tool there was no turning back. Just to be clear I am not saying that the old centralized version control known as TFVC is dead, by no means there are somethings that I will continue to use it for and probably always will like my PowerPoint slides, and much of my training material.
Starting with Git
One thing about git is that there is just an enormous amount of support and its availability on practically every coding IDE for every platform is just remarkable. What really made things simple for me to do the migration was an open source project on CodePlex which has since shut down called Git-TF but you can still download it from here. In fact how I originally used this tool was that I made a separate TFS Project with a git repository. I would work on that new repository and had some CI builds to make sure things kept working and then when I finished a feature I would push this back to the TFVC as a single changeset however because I always link my commits with a work item in the TFVC project it had a side effect that I was not expecting. If you opened the work item you would see some commits listed in the links section. Clicking on the commit link would open up the code in compare mode to the previous commit so you could see what changes were made. Of course this only works if you are looking at work items from web access.
Git-TF also has some other uses and one of those is the ability to take a folder from TFVC and convert that into a git repository with full history. That is what I am going to cover in this post. There are some rules to this that I would like to lay down here as best practises as you don’t want to just take a whole TFVC repository and turn it into one big git repository as that just is not going to work. One of the things to get your head around git is that those respoitories need to be small and should be small remember that you are not getting latest when you clone a repository you are getting the whole thing which includes all the history.
Install Git-TF
One of the easiest ways to install Git-TF on a windows machine is via Chocolatey since it will automatically wire up the PATH for you.
choco install git-tf -y
No Chocolatey or you just don’t want to use this package managment tool you can follow the manual instructions from the Microsoft Download Page
Clean up your Branches
If you have been a client of mine or ever hear me talk about TFS you will certainly have heard me recommending one collection and one TFS Project. You would also have heard me talk about minimizing the use of branches for when you need them. If you have branches going all over the place and code that has never found it’s way back to main you are going to want to clean this up as we are only going to clone main for one of these solutions into a git repository. One of the things that is very different about the git enhanced TFS is that a single TFS project can contain many git repositories. In fact starting from TFS 2015 update 1 you can have a centralized version control TFVC and multiple git repositories in the same TFS project which totally eliminates the need to create a new TFS project just to hold the git repositories. We could move the code with full history into a git repo of the same project we are pulling from.
In our examples that we are pulling into the git repository we are doing this from the solution level as that is where most people using Visual Studio have been doing for decades however the git ideal view of this would be to go even smaller to a single project per repository and stitch the dependencies together for all the other projects through package management through tools like NuGet. Right now that is out of scope for this posting but will delve into this in a future post.
Clone
Now that we have a nice clean branch to create your git repository it is time to run the clone command from the git-tf tool. So from the command line make a nice clean directory and then be in that directory as this is where the clone will appear. Note: if you don’t use the –deep switch you will just get the latest tip and not the full history
mkdir C:\git\MySolutionName
cd c:\git\MySolutionName
git-tf clone https://myaccount.visualstudio.com/DefaultCollection $/MyBigProject/MyMainBranch --deep
You will then be prompted for your credentials (Alt credentials if using visualstudio.com). Once accepted, the download will begin and could take some time depending on the length of your changeset history or size of your repository.
Prep and Cleanup
Now that you have an exact replica of your team project branch as a local git repository, it’s time to clen up some files and add some others to make things a bit more git friendly.
- Remvoe the TFS source control bindings from the solution. You could have done this from within Visual Studio, but its just as easy to do it manually. Simply remove all the
*.vsssccfiles and make small a small edit to your .sln file removing theGlobalSection(TeamFoundationVersionControl) ...EndGlobalSectionin your favorite text editor. - Add a
.gitignorefile. It’s likely your Visual Studio project or solution will have some files you won’t want in your repository (packages, obj, ect) once your solution is built. A near complete way to start is by copying everything from the standard VisualStudio.gitignore file into your own repository. This will ensure all the build generated file, packages, and even your resharper cache folder will not be committed into your new repo. As you can imagine if all you used was Visual Studio to sling your code that would be that. However with so much of our work now moving into more hibrid models where we might use several different tools for different parts of the application tying to manage this gitignore file could get pretty complicated. Recently I came across an online tool at https://www.gitignore.io/ where you pick the OS, IDEs or Programming Language and it will generate the gitignore file for you.
Commit and Push
Now that we have a local git repository, it is time to commit the files, add the remote (back to TFS), and push the new branch (master) back to TFS so the rest of my team can clone this and continue to contribute to the source which will have full history of every check-in that was done before we converted it to git. From the root, add and commit any new files as there may have been some changes from the previous Prep and Clean step.
git add .
git commit -a -m "initial commit after conversion"
We need a git repository on TFS that we want to push this repository to. So from TFS in the Project that you want this new repository:
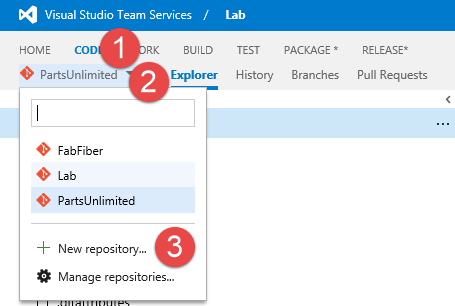
- Click on the Code tab
- Click on the repository dropdown
- Click on the New Repository big “+” sign.
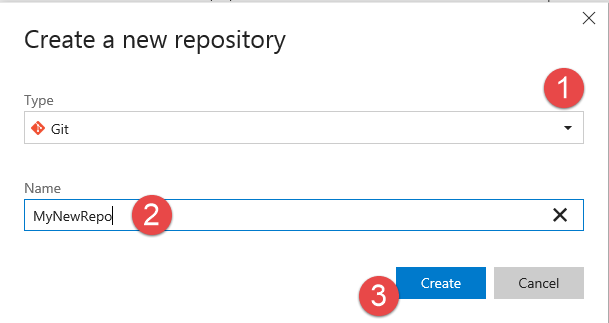
- Make sure the type is Git
- Give it a Name
- Click on the Create button.
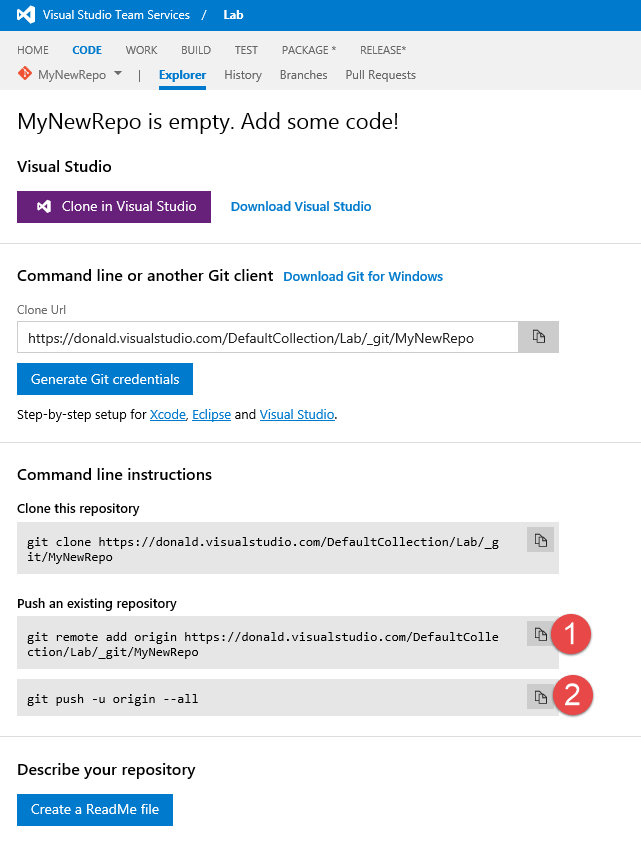
The result page gives you all the information that you need to finish off your migration process.
- This command adds the remote address to your local repository so that it knows where to put it.
- This command will push your local repository to the new remote one.
That’s it! Project published with all history intact.